Mutation testing in Maven & Sonarqube
Introduction
You might have heard about Mutation Testing before. In the last 5 or 6 years it’s been a reasonably hot (“warm”?) topic to discuss in blogs and dev talks. So what is the added value over code coverage with just Unit Testing? Even if you could pride yourself with over 90% line and branch coverage, that coverage means nothing apart from that unit tests are touching production code. It says nothing about how well that code is tested, it doesn’t care whether any asserts exist in your tests. Imagine an engineer that tests a power drill he designed on a sheet of paper, and declaring that it does exactly what it was designed for: drilling holes. It’s obvious that this test is meaningless for a power drill that is meant to be used on wood, steel or stone.
Mutation tests aim to expose tests that cover the lines they’re meant to cover but are insufficient in testing the intent of the code. The idea behind this is fairly simple: introduce “mutants” in the code that is being tested, and check whether the unit tests that cover these mutants still succeed or start to fail. If a test still succeeds, that means the test falls short of verifying the complete intent of the code!
So what is a “mutant” in this case?
Most of the time, it’s as simple as an operator +, -, &&, || etc., that is “mutated” into a different one.
In this way, a mutation testing framework helps to identify code that is not tested sufficiently and identifies weak tests that still succeed when mutants are introduced.
If this is something you consider to be a valuable addition to your project, consider trying out Mutation Testing by following the guide below.
In this blog post, I walk through the steps of configuring and using the mutation testing framework PIT for a Java codebase and explain how to integrate it with the code quality inspection platform SonarQube.
Mutation testing frameworks
As we can see on PIT‘s website, the framework characterizes itself as a contrast to other existing frameworks in that most of the other frameworks are less well adopted, are more attuned to academic research and less well maintained. Alternatives include Major, Mutator, Bacterio, Judy, Javalanche, muJava, Jumble and Jester. Moreover, for the purpose of this blog I am interested in integration with SonarQube, which PIT is capable of.
Preparation
This guide will assume you are developing a Java project using Maven as the build tool. Gradle and Ant are also options, but won’t be covered in this post. PIT even has instructions for manual installation with the command line, if you prefer.
Should you start from scratch, here’s a command to get you started with a basic project structure provided by maven using the convenient mvn archetype command:
mvn archetype:generate -DgroupId=<your_group_name> -DartifactId=<your_artifact_name> -DarchetypeArtifactId=maven-archetype-quickstart -DinteractiveMode=falseMake sure JUnit is in your dependencies:
<dependency>
    <groupId>junit</groupId>
    <artifactId>junit</artifactId>
    <version>4.12</version>
    <scope>test</scope>
</dependency>
And have some code accompanied by one or more unit tests. After all, we want to hit at least some of the code to see what happens to the mutants that PIT will introduce!
Finally, make sure that your SonarQube instance is on version 6.7 or later. Even though integration may be possible for earlier versions, this is not recommended since it requires some additional configuration. This guide was written using SonarQube version 7.5.
For further instructions on setting up your SonarQube instance, see the chapter [Using PIT with SonarQube](#using-pit-with-sonarqube).
Using PIT with Maven
PIT can generate a test report for you with a simple command. All you need to do is run a build that includes tests and it should output an xml report to the “target/” folder. You can pass configs either through command line options or, as this guide will demonstrate, use maven to configure PIT in a “pom.xml” file.
Maven configuration
In your “pom.xml” file, define the following as a barebones configuration for PIT inside the build tag:
<plugins>
    <plugin>
        <groupId>org.pitest</groupId>
        <artifactId>pitest-maven</artifactId>
        <version>1.4.3</version>
        <configuration>
            <outputFormats>
                <outputFormat>XML</outputFormat>
            </outputFormats>
        </configuration>
    </plugin>
</plugins>
We choose XML as our output format, as the SonarQube plugin we’ll be using expects the report that way.
other available options are HTML (default) and CSV.
If you don’t include the paths in this configuration, PIT will scan the project structure and analyse any class it can find. If you want to limit the packages that PIT analyses, you can use a configuration similar to the one below:
...
<plugin>
    <groupId>org.pitest</groupId>
    <artifactId>pitest-maven</artifactId>
    <version>1.4.3</version>
    <configuration>
        <targetClasses>
            <param>nl.casper.*</param>
        </targetClasses>
        <targetTests>
            <param>nl.casper.*</param>
        </targetTests>
        <outputFormats>
            <outputFormat>XML</outputFormat>
        </outputFormats>
    </configuration>
</plugin>
...
A common use case for this configuration is managing the operators to be mutated, this can be achieved as follows:
...
<plugin>
    <groupId>org.pitest</groupId>
    <artifactId>pitest-maven</artifactId>
    <version>1.4.3</version>
    <configuration>
        <targetClasses>
            <param>nl.casper.*</param>
        </targetClasses>
        <targetTests>
            <param>nl.casper.*</param>
        </targetTests>
        <mutators>
         <mutator>CONSTRUCTOR_CALLS</mutator>
         <mutator>VOID_METHOD_CALLS</mutator>
         <mutator>RETURN_VALS</mutator>
        </mutators>
        <outputFormats>
            <outputFormat>XML</outputFormat>
        </outputFormats>
    </configuration>
</plugin>
...
For more information on mutators, see the pitest quickstart guide. Generating a mutation report
When you run a build with a test phase, you can include the command to generate a PIT mutation report:
mvn clean package org.pitest:pitest-maven:mutationCoverageYou should now find an xml file under target/pit-report/mutations.xml which displays all the metrics generated by PIT.
My example uses a simple calculator class with some unit tests. In my case it found a couple of mutants in the code that ‘survived’, for example:
...
    public long subtract(long first, long second) {
        if (first > 0)
            return first - second;
        else
            return second;
  }
...
Above method is tested with a couple of unit tests. PIT reports that there are some tests that still pass if the operator in the if-clause is modified. Therefore, the unit tests don’t test this code sufficiently.
Local Testing
The approach described above should be a good basis to get started with PIT mutation testing on a developer machine, to assist you in making sure the code you commit is thoroughly tested. Should you want to incorporate this approach on a larger scale, consider putting the plugin configuration inside a maven profile, ensuring it only runs when you want it to run.
Using PIT with SonarQube
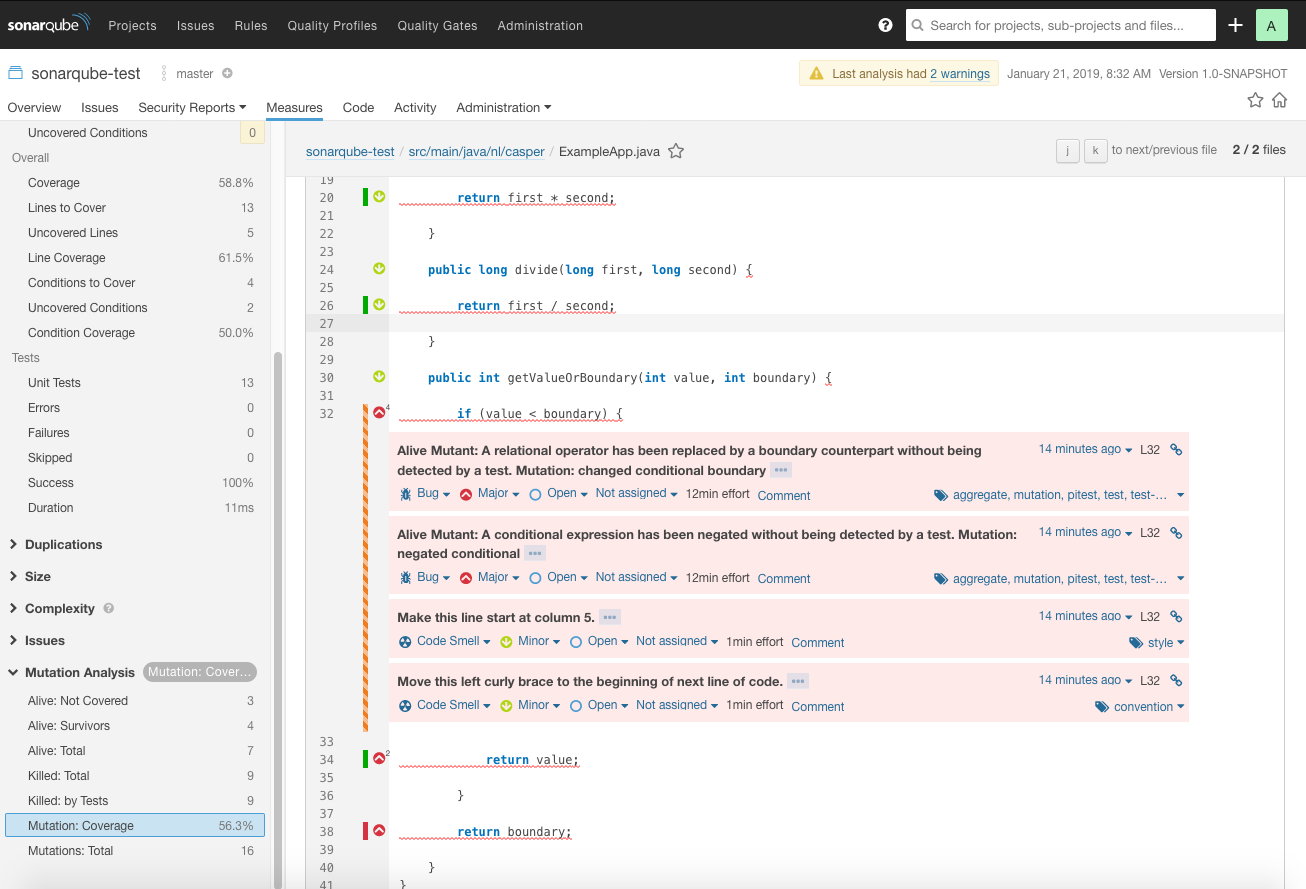
Integration with SonarQube can be achieved with a plugin. As of Januari 2019, “Mutation Analysis” is the most qualified out of the two plugins that are available through the marketplace. Using this plugin in a SonarQube profile will provide you with a detailed overview of the mutation report next to the usual code coverage report, as well as add onto the existing base of useful feedback with high traceability.
Installation
If you do not have a SonarQube instance, you can download the installation files from their website. If you are like me and just want to see how it works, you could also pull a docker image from dockerhub (be mindful that this docker image is intended for testing purposes): from a shell, use
docker pull sonarqubeand start it using
`docker run -d --name sonarqube -p 9000:9000 sonarqube`Now you can navigate the interface from http://localhost:9000.
By default the admin’s login info is admin, admin.
You can install the “Mutation Analysis” plugin either through the marketplace on the admin screen of SonarQube’s Web Interface, or manually install it as per the product’s website.
Using SonarQube profiles
Before you can start seeing mutation coverage on a project’s page, you must first configure a profile that contains configuration for viewing mutation report metrics. You can either use the default profile included with the plugin for this, or extend another profile with rules concerning mutation report metrics. You can edit profiles through the “Quality Profiles” item in the menu bar at the top. Through this overview you can edit profiles and optionally set them as default. If you need to use the mutation test rules on top of another ruleset, the best thing to do is to create a new profile that has the basic profile as a parent. Click on “activate more” under the “Rules” box and find the mutation analysis profile. If you then click on “bulk change” you can choose to add all rules from this profile to your new one.
Should you want to use a different profile for a particular project, you can always override the default settings through an existing project’s “Administration” menu item.
Sending reports to SonarQube
The PIT report includes both mutation reports as well as regular line coverage. Should you want to compare the results of JaCoCo line coverage, the following part will demonstrate how to configure maven to send JaCoCo line coverage reports. As a side note, be aware that when you use the Pitest plugin to generate line coverage reports, Maven will not use JaCoCo, but Pitest’s own implementation of report generation. There might be differences between these two implementations, but I did not find anything significant or worrisome about Pitest’s approach.
To send a regular code coverage report to SonarQube, you may add configuration to your pom.xml that looks something like this:
...
<properties>
    <sonar.core.codeCoveragePlugin>jacoco</sonar.core.codeCoveragePlugin>
    <sonar.jacoco.reportPath>${project.basedir}/../target/jacoco.exec</sonar.jacoco.reportPath>
    <sonar.language>java</sonar.language>
</properties>
...
<build>
 <plugins>
 <plugin>
     <groupId>org.jacoco</groupId>
     <artifactId>jacoco-maven-plugin</artifactId>
     <version>0.8.2</version>
     <configuration>
         <append>true</append>
     </configuration>
     <executions>
         <execution>
             <id>agent-for-ut</id>
             <goals>
                 <goal>prepare-agent</goal>
             </goals>
         </execution>
         <execution>
             <id>jacoco-site</id>
		            <phase>verify</phase>
             <goals>
                 <goal>report</goal>
             </goals>
         </execution>
     </executions>
 </plugin>
 </plugins>
</build>
...
To send reports to SonarQube, run the command for generating the mutation report, e.g.:
mvn clean package org.pitest:pitest-maven:mutationCoverageAfterwards, the target folder will contain the test report, and you can use the following command to send it to your SonarQube instance:
mvn sonar:sonarAs required, either decorate this command with properties specific to your instance in -D format, or configure a Maven profile in your pom.xml file to contain these properties (see SonarQube documentation for some examples).
Hopefully, you should now be able to find your project on SonarQube, complete with all the mutation testing rules that you have added earlier.
With Maven, it should be straightforward to integrate Pitest mutation testing in your pipeline with a couple of commands for use in Continuous Integration.
Conclusion
In this blogpost we discussed the concept of mutation testing, how to configure a maven project to generate a report, how to configure a SonarQube instance to add mutation analysis and how to send a report to that SonarQube instance. I hope this will improve your test quality coming 2019!
